An introduction to fluorescence microscopy.
Imaging with visible light is great because, well, we can see it. But beyond just being intuitive, visible light is relatively safe for biological samples, works well in physiological conditions, and we have developed excellent detectors for it (think of your cell phone camera). We may then ask: “How can we best use light to study biology?”
You all probably remember playing with an upright microscope in your high school biology class. The microscope can come in many forms: from a simple mirror below sample requiring you to sit by the window on a sunny day, or it may have its own light, positioned either above or below the sample. Either way, an objective was used to magnify cells from an onion, or something similar, and it looked more-or-less exactly as you would expect it to, had you squinted really hard. That type of microscopy is called bright-field microscopy and it is nearly the same as we perceive the world with our eyes – we see light that is scattered or reflected by objects.
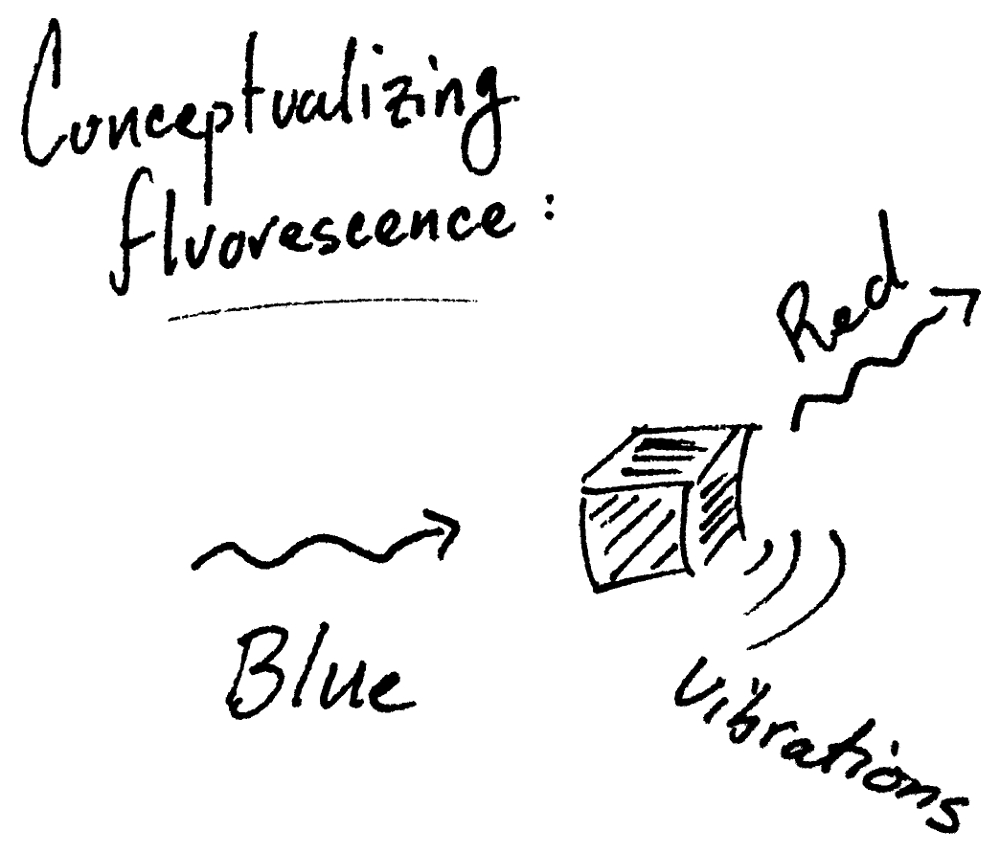
Another type of microscopy, that is distinctly different, is called fluorescence microscopy. Fluorescence is a process in which a molecule can absorb light (e.g., blue light) and then emit longer wavelength (i.e., lower energy) light (e.g., red light).  In this example, a fluorescence microscope works by shining only blue light onto the sample and then detecting only red fluorescence. This is brilliant because if you can design a fluorescent molecule (which we can!) then the location of that molecule can be easily imaged regardless of all the other ‘stuff’. It is almost cheating: imagine how easy it would be to find a needle in a haystack if the hay was invisible!
How does it work? Well, you may have noticed that I always have written that each color of light also has an energy and a wavelength. A single unit of light is called a photon, and putting everything together we know that a photon has a specific amount of energy that corresponds to its color – that is, a violet photon has more energy than a red photon. On the extremes we have higher-energy ultra-violet (UV) photons and lower-energy infrared (IR) photons. When the correct energy light is shined on a fluorescent molecule, the light is absorbed and quickly a lower-energy photon (i.e., more-red) is emitted. The missing energy is turned into vibrations (i.e., heat).

Today, fluorescent molecules can easily be positioned in biological samples, either with specific antibodies or with genetic labeling. Then, in the microscope whatever researchers are studying literally lights up while everything else remains dark. It is brilliant.
If, however, you want to keep look deeper and deeper into tissue, you find that visible light can’t go very far. This isn’t surprising if you consider trying to shine a flashlight through glass of milk – you won’t see it on the other side. One of the easiest things to do is use longer-wavelength light (i.e., lower-energy IR light) which is less likely to be scattered by small biological ‘things’. This is why multi-photon microscopy is important!
The idea is quite straightforward but it is remarkable that it works. Since we know that a fluorescent molecule can absorb a higher-energy blue photon, we can then ask if it can instead simultaneously absorb two lower-energy photons if the total energy is kept the same? The answer is yes! And this works also for three photons, and four, and more. With this technology, we can image deep into biological tissue and still watch the same fluorescent molecules light up.

Leave a comment